Dabeaz
Dave Beazley's mondo computer blog. [ homepage | archive ]Sunday, August 29, 2010
Decoding Superboard II Cassette Audio Using Python 3, Two Generators, and a Deque
Welcome to the second installment of using Python to encode/decode cassette audio data for use with my resurrected Superboard II system. Last time, I talked about the problem of encoding text files into WAV audio files for uploading via the Superboard cassette input. In this post, I explore the opposite problem--namely using Python to decode WAV audio files recorded from the cassette output port back into the transmitted byte stream--in essence, writing a Python script that performs the same function as a modem.
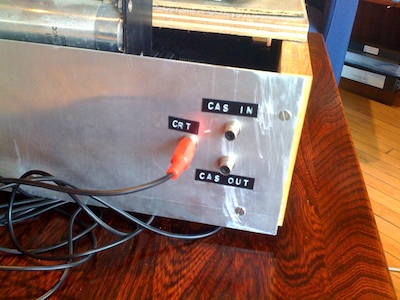
The cassette ports of my Superboard II
Although decoding audio data from the cassette output sounds like it might be a tricky exercise involving sophisticated signal processing (e.g., FFTs), it turns out that you can easily solve this problem using nothing more than a few built-in objects (bytearrays, deques, etc.) and a couple of simple generator functions. In fact, it's a neat exercise involving some of the lesser known, but quite useful data processing features of Python. Plus, it seems like a good excuse to further bang on the new Python 3 I/O system. So, let's get started.
Audio Format
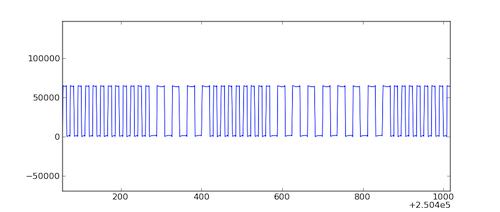
In my earlier post, I described how the format used for cassette recordings is the Kansas City Standard (KCS). The encoding is really simple--8 cycles at 2400 HZ represent a 1-bit and 4 cycles at 1200 HZ represent a 0-bit. Individual bytes are encoded with 1 start bit (0) and two stop bits (1s). Here is a plot that shows some waveforms from a fragment of recorded audio.
It is important to stress that this encoding is intentionally simple--designed to operate on systems of its era (1970s) and to be resistant to all sorts of problems associated with cassette tapes. For example, noise, low-fidelity, variations in tape playback speed, etc. Needless to say, it's not especially fast. Encoding a single byte of data requires 11 bits or 88 cycles of a 2400 HZ wave. If you do the math, that works out to about 27 bytes per second or 300 baud.
A Decoding Strategy (Big Picture)
KCS decoding is almost entirely based on counting cycles of two different wave frequencies. That is, to decode the data we simply sample the audio data and count the number of zero-crossings. At a high level, decoding a single bit works as follows:
- Read a sample of N audio frames where N represents the number of frames required to represent an entire bit (8 cycles at 2400 Hz).
- Count the number of zero crossings found in the sample.
- If the the number of crossings is near 16, then it represents a 1.
- If the number of crossings is near 8, then it represents a 0.
From bits, it's relatively simple to make the transition to bytes. You simply have to recognize the start bit and sample the next 8 bits as data bits to form a byte.
Deconstructing a WAV File to Sign Bits
Python has a module wave that can be used to read WAV files. Here is an example of opening a WAV file and obtaining some useful metadata about the recorded audio.
>>> import wave
>>> wf = wave.open("osi_sample.wav")
>>> wf.getnchannels()
2
>>> wf.getsampwidth()
2
>>> wf.getframerate()
44100
>>>
In the above example, the WAV file is a 44100Hz stereo recording using 16-bit (2 byte) samples.
For our decoding, we are only interested in counting the number of zero-crossings in the audio data. For a 16-bit WAV file, the "zero" is represented by a sample value of 2**15 (32768). A "positive" wave sample has a value greater than 2**15 whereas a "negative" wave sample has a value less than that. Conveniently, this determination can be made by simply stripping all sample data away except for the most significant bit.
Here is a generator function that takes a sequence of WAV audio data and reduces it to a sequence of sign bits.
# Generate a sequence representing sign bits
def generate_wav_sign_bits(wavefile):
    samplewidth = wavefile.getsampwidth()
    nchannels = wavefile.getnchannels()
    while True:
        frames = wavefile.readframes(8192)
        if not frames:
            break

        # Extract most significant bytes from left-most audio channel
        msbytes = bytearray(frames[samplewidth-1::samplewidth*nchannels])

        # Emit a stream of sign bits
        for byte in msbytes:
            yield 1 if (byte & 0x80) else 0
This generator works by reading a chunk of raw audio frames and using an extended slice frames[samplewidth-1::samplewidth*nchannels] to extract the most significant byte from each sample of the left-most audio channel. The result is placed into a bytearray object. A bytearray stores a sequence of bytes (like a string), but has the nice property that the stored data is presented as integers instead of 1-character strings. This makes it easy to perform numeric calculations on the data. The yield 1 if (byte & 0x80) else 0 simply yields the most significant bit of each byte.
The resulting output from this generator is simply a sequence of sign bits. For example, the output will look similar to this:
>>> import wave
>>> wf = wave.open("sample.wav")
>>> for bit in generate_wav_sign_bits(wf):
...     print(bit,end="")
...
11111111000000000111111111000000000011111111100000000011111111110000000001111111
11000000000011111111100000000011111111110000000001111111110000000000111111111000
00000011111111110000000001111111110000000000111111111000000000111111111100000000
01111111110000000000111111111000000000111111111100000000011111111100000000001111
...
From Sign Bits to Sign Changes
Although a sequence of wave sign bits is interesting, it's not really that useful. Instead, we're really more interested in zero-crossings or samples where the sign changes. Getting this information is actually pretty easy--simply compute the exclusive-or (XOR) of successive sign bits. If you do this, you will always get 0 when the sign stays the same or a value 0x80 when the sign flips. Here is a modified version of our generator function.
# Generate a sequence representing changes in sign
def generate_wav_sign_change_bits(wavefile):
    samplewidth = wavefile.getsampwidth()
    nchannels = wavefile.getnchannels()
    previous = 0
    while True:
        frames = wavefile.readframes(8192)
        if not frames:
            break

        # Extract most significant bytes from left-most audio channel
        msbytes = bytearray(frames[samplewidth-1::samplewidth*nchannels])

        # Emit a stream of sign-change bits
        for byte in msbytes:
            signbit = byte & 0x80
            yield 1 if (signbit ^ previous) else 0
            previous = signbit
This slightly modified generator now produces a sequence of data with sign change pulses in it similar to this:
>>> import wave
>>> wf = wave.open("sample.wav")
>>> for bit in generate_wav_sign_change_bits(wf):
...     print(bit,end="")
...
00000000100000000100000000100000000010000000010000000010000000001000000001000000
00100000000010000000010000000010000000001000000001000000001000000000100000000100
00000010000000001000000001000000001000000000100000000100000000100000000010000000
01000000001000000000100000000100000000100000000010000000010000000010000000001000
...
Bit Sampling
At this point, the WAV file has been deconstructed into a sequence of sign changes. Now, all we have to do is sample the data and count the number of sign changes. To do this, use a deque and some clever iterator tricks. Here is some code:
from itertools import islice
from collections import deque

# Base frequency (representing a 1)
BASE_FREQ = 2400

# Generate a sequence of data bytes by sampling the stream of sign change bits
def generate_bytes(bitstream,framerate):
    bitmasks = [0x1,0x2,0x4,0x8,0x10,0x20,0x40,0x80]

    # Compute the number of audio frames used to encode a single data bit
    frames_per_bit = int(round(float(framerate)*8/BASE_FREQ))

    # Queue of sampled sign bits
    sample = deque(maxlen=frames_per_bit)

    # Fill the sample buffer with an initial set of data
    sample.extend(islice(bitstream,frames_per_bit-1))
    sign_changes = sum(sample)

    # Look for the start bit
    for val in bitstream:
        if val:
            sign_changes += 1
        if sample.popleft():
            sign_changes -= 1
        sample.append(val)

        # If a start bit detected, sample the next 8 data bits
        if sign_changes <= 9:
            byteval = 0
            for mask in bitmasks:
                if sum(islice(bitstream,frames_per_bit)) >= 12:
                    byteval |= mask
            yield byteval
            # Skip the final two stop bits and refill the sample buffer
            sample.extend(islice(bitstream,2*frames_per_bit,3*frames_per_bit-1))
            sign_changes = sum(sample)
This code might require some study, but the concept is simple. A sample deque (the sample variable) is created, the size of which corresponds to the number of audio frames needed to represent a single data bit. It might be a little known fact, but if you create a deque with a maxlen setting, it turns into a kind of shift register. That is, new items added at the end will automatically cause old items to fall off the front if the length is exceeded. It is also very fast.
Getting back to our algorithm, audio data is pushed into this deque and the number of sign changes updated. If no data is being transmitted, the number of sign changes in the sample will hover around 16. However, if a start-bit is encountered, the number of sign changes in the sample will drop to around 8. In our code, this is detected by checking for 9 or fewer sign changes in the sample. Keep in mind that we don't really know when the start bit will appear--thus, the code proceeds frame-by-frame until the number of sign changes drops to a sufficiently low value. Once the start bit is detected, data bits are quickly sampled, one after the other, to form a complete byte. After the data bits are sampled, the two stop bits are skipped and the sample buffer refilled with the next potential start bit.
Does it Work?
Hell yes it works. Here is a short test script that ties it all together:
if __name__ == '__main__':
    import wave
    import sys
    if len(sys.argv) != 2:
        print("Usage: %s infile" % sys.argv[0],file=sys.stderr)
        raise SystemExit(1)

    wf = wave.open(sys.argv[1])
    sign_changes = generate_wav_sign_change_bits(wf)
    byte_stream  = generate_bytes(sign_changes, wf.getframerate())

    # Output the byte stream
    outf = sys.stdout.buffer.raw
    while True:
        buffer = bytes(islice(byte_stream,80))
        if not buffer:
            break
        outf.write(buffer)
If we run this program on the osi_sample.wav file, we get the following output (which is exactly what it should be):
bash-3.2$ python3 kcs_decode.py osi_sample.wav


 10 FOR I = 1 TO 1000
 20 PRINT I;
 30 NEXT I
 40 END
OK
bash-3.2$
That's pretty nice--two relatively simple generator functions and some basic data manipulation on deques has turned the audio stream into a stream of bytes.
One thing that's not shown above is the embedded NULLs related to newline handling. You can see them if you do this:
bash-3.2$ python3 kcs_decode.py osi_sample.wav | cat -e
^M^@^@^@^@^@^@^@^@^@^@$
^M^@^@^@^@^@^@^@^@^@^@$
 10 FOR I = 1 TO 1000^M^@^@^@^@^@^@^@^@^@^@$
 20 PRINT I;^M^@^@^@^@^@^@^@^@^@^@$
 30 NEXT I^M^@^@^@^@^@^@^@^@^@^@$
 40 END^M^@^@^@^@^@^@^@^@^@^@$
OK^M^@^@^@^@^@^@^@^@^@^@$
bash-3.2$
How well does it work?
To test this decoding process, I recorded various audio samples directly from my Superboard using Audacity on my Mac. I used different sampling frequencies ranging from 8000 Hz to 48000 Hz. For all of the samples, the decoding process worked exactly as expected, producing no observable decoding errors.
Decoding 5788 bytes of transmitted test data from 47 Mbyte WAV file of 48 KHz stereo samples takes about 5.7 seconds on my Macbook (2.4 Ghz Intel Core Duo) for a baud rate of about 11000--more than 35 times faster than the Superboard can actually send it. Decoding the same data recorded in a 7.3 Mbyte WAV file with 8 KHz stereo samples takes about 0.97 seconds for a baud rate of about 65000 (Note: these baud rates are based on 11 bits of encoding for every data byte).
Although I could work to make the script run faster, it is already plenty fast for my purposes. Moreover, the generator-based approach means that they really aren't limited by the size of the input WAV files.
Final Words
If you are interested in the final script, you can find it in the file kcs_decode.py. Although I've now written scripts to encode and decode Superboard II cassette audio data, this is the hardly the last word. Stay tuned (evil wink ;-).
Footnote
If you're going to try any of this code, make sure you're using Python-3.1.2 or newer. Earlier versions of Python 3 seem to have buggy versions of the wave module.
Sunday, August 22, 2010
Using Python to Encode Cassette Recordings for my Superboard II
See Part 2 for a discussion of decoding audio
See Part 3 to see real-time audio encoding/decoding used in conjunction with telnet.
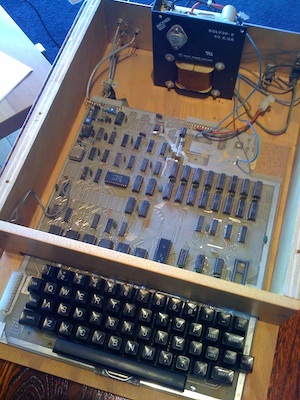
My family's first computer was an Ohio Scientific Superboard II--something that my father purchased around 1979. At the time, the Superboard II was about the most inexpensive computer you could get. In fact, it didn't even include a power supply or a case. If you wanted those features, you had to add them yourself. Here's a picture of our system with the top of the (homemade) case removed so that you can see inside.
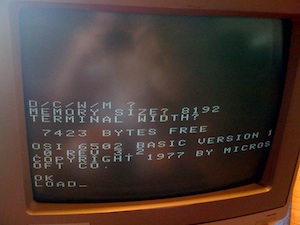
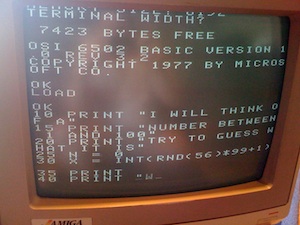
To say that the Superboard II is minimal is certainly an understatement by today's standards. There was only 8192 total bytes of memory and no real operating system to speak of. When you powered on the system you could either run the machine language monitor or Microsoft Basic Version 1.0. Here's a sample of what appeared on the screen (yes, that's maximum resolution):

Much to my amazement, our old Superboard II system stayed in the family. For about 20-25 years it sat in the basement of my mother's house surrounded by boxes. After that, it sat for a few years in a closet at my brother's condo. Occasionally, we had discussed the idea of powering it up to see if it still worked, but never got around to it--until now. About a week ago, my brother threw the old computer along with an old Amiga monitor in the back of his car and headed east to Chicago. After some discussion, we decided we'd just blow the dust out of it, power it on, and see what would happen.
Unbelievably, the machine immediately sprang to life. The above screenshot was taken just today. Since powering it up, I've written a few short programs to test the integrity of the memory and ROMs. Aside from a 1-bit memory error (bit 2 at location 0x861) it appears to be fully functional.
One problem with these old machines is that they had very little support for any kind of real I/O. Forget about USB, Firewire, or Ethernet. Heck, this machine didn't even have a serial or parallel port on it. In fact, the only external interface was a pair of audio ports for saving and loading programs on a cassette tape player--which was also the only way to save any of your work as there was no disk drive of any kind. Here is a picture of the back
Since the old machine seemed to be working, I got to thinking about ways to program it. Working directly on the machine was certainly possible, but if you look at the keyboard, you'll notice that there aren't even any arrow keys (there is no cursor control anyways) and some of the characters are in unusual locations. Plus, some of the keys are starting to show their age. For example, pressing '+' tends to produce about 3 or 4 '+' characters due to some kind of key debouncing problem. So, like most Python programmers, I started to wonder if there was some way I could write a script that would let me program the machine in a more straightforward manner from my Mac.
Since the only input port available on the machine was a cassette audio port, the proposition seemed simple enough: could I write a Python script to convert a normal text file into a WAV audio file that when played, would upload the contents of the text file into the Superboard II? Obviously, the answer is yes, but let's look at the details.
Viewing Cassette Audio Output
On many old machines, cassette output is encoded using something called the Kansas City Standard. It's a pretty simple encoding. A 0 is encoded as 4 cycles of a 1200 Hz sine wave and a 1 is encoded as 8 cycles of a 2400 Hz sine wave. If no data is being transmitted, there is a constant 2400 Hz wave. Each byte of data is transmitted by first sending a 0 start bit followed by 8 bits of data (LSB first) followed by two stop bits (1s). Click here to hear a WAV file sample of actual data being saved by my Superboard II. I recorded this sample using Audacity on my Mac.
Python has a built-in module for reading WAV files. Combined with Matplotlib you can easily view the waveform. For example:
>>> import wave
>>> f = wave.open("osi_sample.wav")
>>> f.getnchannels()
2
>>> f.getsampwidth()
2
>>> f.getnframes()
1213851
>>> rawdata = bytearray(f.readframes(1000000))
>>> del rawdata[2::4]    # Delete the right stereo channel
>>> del rawdata[2::3]
>>> wavedata = [a + (b << 8) for a,b in zip(rawdata[::2],rawdata[1::2])]
>>> import pylab
>>> pylab.plot(wavedata)
>>>
After some panning and zooming, you'll see a plot like this. You can observe the different frequencies used for representing 0s and 1s. Again, this plot was created from an actual sound recording of data saved by the system.
Converting Text into a KCS WAV File
Using Python's wave module, it is relatively straightforward to go in the other direction--that is, take a text file and encode it into a WAV file suitable for playback. Here is the general strategy for how to do it:
- Define a utility function for making a square-wave pulse.
- Define wave fragments for a 0-bit (4 cycles of a 1200 Hz square wave) and 1-bit (8 cycles of a 2400 Hz square wave).
- Write a function that encodes a byte of data as an 11-bit wave fragment consisting of a start bit, 8 bits of data, and 2 stop bits.
- Write a function that takes an input text file, encodes every single byte using this scheme, and writes a big WAV file with some extra padding on the front and back.
Here is a script kcs_encode.py that has one implementation.
##!/usr/bin/env python3
# kcs_encode.py
#
# Author : David Beazley (http://www.dabeaz.com)
# Copyright (C) 2010
#
# Requires Python 3.1.2 or newer

"""
Takes the contents of a text file and encodes it into a Kansas
City Standard WAV file, that when played will upload data via the
cassette tape input on various vintage home computers. See
http://en.wikipedia.org/wiki/Kansas_City_standard
"""

import wave

# A few global parameters related to the encoding

FRAMERATE = 9600       # Hz
ONES_FREQ = 2400       # Hz (per KCS)
ZERO_FREQ = 1200       # Hz (per KCS)
AMPLITUDE = 128        # Amplitude of generated square waves
CENTER    = 128        # Center point of generated waves

# Create a single square wave cycle of a given frequency
def make_square_wave(freq,framerate):
    n = int(framerate/freq/2)
    return bytearray([CENTER-AMPLITUDE//2])*n + \
           bytearray([CENTER+AMPLITUDE//2])*n

# Create the wave patterns that encode 1s and 0s
one_pulse  = make_square_wave(ONES_FREQ,FRAMERATE)*8
zero_pulse = make_square_wave(ZERO_FREQ,FRAMERATE)*4

# Pause to insert after carriage returns (10 NULL bytes)
null_pulse = ((zero_pulse * 9) + (one_pulse * 2))*10

# Take a single byte value and turn it into a bytearray representing
# the associated waveform along with the required start and stop bits.
def kcs_encode_byte(byteval):
    bitmasks = [0x1,0x2,0x4,0x8,0x10,0x20,0x40,0x80]
    # The start bit (0)
    encoded = bytearray(zero_pulse)
    # 8 data bits
    for mask in bitmasks:
        encoded.extend(one_pulse if (byteval & mask) else zero_pulse)
    # Two stop bits (1)
    encoded.extend(one_pulse)
    encoded.extend(one_pulse)
    return encoded

# Write a WAV file with encoded data. leader and trailer specify the
# number of seconds of carrier signal to encode before and after the data
def kcs_write_wav(filename,data,leader,trailer):
    w = wave.open(filename,"wb")
    w.setnchannels(1)
    w.setsampwidth(1)
    w.setframerate(FRAMERATE)

    # Write the leader
    w.writeframes(one_pulse*(int(FRAMERATE/len(one_pulse))*leader))

    # Encode the actual data
    for byteval in data:
        w.writeframes(kcs_encode_byte(byteval))
        if byteval == 0x0d:
            # If CR, emit a short pause (10 NULL bytes)
            w.writeframes(null_pulse)

    # Write the trailer
    w.writeframes(one_pulse*(int(FRAMERATE/len(one_pulse))*trailer))
    w.close()

if __name__ == '__main__':
    import sys
    if len(sys.argv) != 3:
        print("Usage : %s infile outfile" % sys.argv[0],file=sys.stderr)
        raise SystemExit(1)

    in_filename = sys.argv[1]
    out_filename = sys.argv[2]
    data = open(in_filename,"U").read()
    data = data.replace('\n','\r\n')         # Fix line endings
    rawdata = bytearray(data.encode('latin-1'))
    kcs_write_wav(out_filename,rawdata,5,5)
You can study the implementation yourself for some of the finer details. However, most of the heavy work is carried out using operations on Python's bytearray object. For padding the audio, a constant 1 bit is emitted (a constant 2400 Hz wave). To handle old text encoding, newlines are replaced with a carriage return. Moreover, to account for the slow speed of the Superboard II, a pause consisting of about 80 bits is inserted after each carriage return.
To use this script, you now just need an old BASIC program to upload. Here's a really simple one (from the Superboard II manual):
10 PRINT "I WILL THINK OF A"
15 PRINT "NUMBER BETWEEN 1 AND 100"
20 PRINT "TRY TO GUESS WHAT IT IS"
25 N = 0
30 X = INT(RND(56)*99+1)
35 PRINT
40 PRINT "WHATS YOUR GUESS   ";
50 INPUT G
52 N = N + 1
55 PRINT
60 IF G = X THEN GOTO 110
70 IF G > X THEN GOTO 90
80 PRINT "TOO SMALL, TRY AGAIN ";
85 GOTO 50
90 PRINT "TOO LARGE, TRY AGAIN ";
100 GOTO 50
110 PRINT "YOU GOT IT IN";N;" TRIES"
113 IF N > 6 THEN GOTO 120
117 PRINT "VERY GOOD"
120 PRINT
130 PRINT
140 GOTO 10
150 END
Let's say this program is in a file guess.bas. Here's how to encode it using our script.
bash $ python3 kcs_encode.py guess.bas guess.wav
bash $ ls -l guess.wav
352652
bash $
Now, we have an audio file that's ready to go (note: it's rather impressive that a 476 byte input file has now expanded to a 350Kbyte audio file). You can listen to it here. Note that data doesn't start until about 5 seconds have passed.
Now, the ultimate test. Does this audio file even work? To test it, we first hook up the audio input of the Superboard II to my Macbook.

Next, we go over to the Superboard II and type 'LOAD'
Next, we start playing the WAV file on the Mac. After a few seconds, you see data streaming in (at about 300 baud). Excellent!
Finally, the ultimate test. Let's play the game:
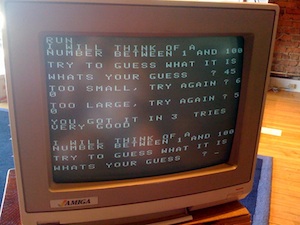
Awesome! Note for anyone under the age of 40: yes, this is the kind of stuff people did on these old machines--and we thought it was every bit as awesome as your shiny iPad. Maybe even more awesome. I digress.
(It occurs to me that fooling around on this machine might be the reason why I got an F in 7th grade math and had to attend summer school)
Just so you can get the full effect, here is a video of the upload in action. It's really hard to believe that systems were so slow back then. For big programs, it might take 5 minutes or more to load (even with the 8K limit):
Well, that's about it for now. The power of Python never ceases to amaze me--once again a problem that seems like it might be hard is solved with a short script using nothing more than a single built-in library module and some basic data manipulation. Next on the agenda: A Python script to decode WAV files back into text files.
By the way, if you take one of my classes, you can play with the Superboard II yourself (wink ;-).
Friday, August 20, 2010
Python Networks, Concurrency, and Distributed Systems
If you've been paying any attention, you've probably noticed programmers talking a lot about multicore, concurrency, distributed computing, parallel programming, and more. If you've ever wanted to know more about how all of this stuff works, then you should come to Chicago and attend my upcoming Python Networks, Concurrency, and Distributed Systems course September 13-17.
Simply stated, this is probably the most intense and in-depth course on this topic you are going to find anywhere--the kind of course where you'll start with the basics and dig deep to see how everything else works under the covers.
If you attend, here's what to expect.
Day 1 (Fundamentals): The first day introduces some fundamental topics including socket programming, encoding/decoding, data handling (XML, JSON, etc.), and aspects of writing HTTP-based web services.
Day 2 (Threads and Multiprocessing): An in-depth look at Python thread programming, multiprocessing, and concurrent programming techniques. This includes knowing how to properly use synchronization primitives (locks, semaphores, etc.) and queues. Naturally, I'll probably say a few things about the GIL.
Day 3 (Serialization, Messaging, and Distributed Computing): Details on data serialization, message passing, message queues, and distributed computation. Major topics include the actor model, remote procedure call (RPC), REST, and distributed objects.
Day 4 (Async, Events, and Tasklets): An in-depth examination of asynchronous and event-driven I/O handling. Part of the coverage will simply be about I/O handling in the operating system. We'll then build some event-driven applications and look at different event-driven programming models. This includes the use of generators and coroutines to implement microthreads or tasklets.
Day 5 (Coding): The last half-day will be spent coding. Possible topics include implementing your own map-reduce library, using third-party libraries (Twisted, Py0MQ, gevent, etc.), or simply working on your own projects.
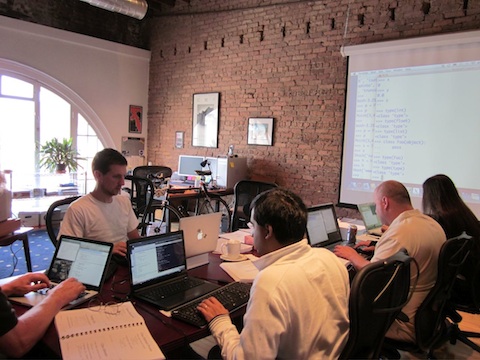
You should know that my classes are small--no more than 6 people. As a result, there is a significant amount of coding, discussion and interaction. This is not a course where you will simply sit in the back and listen the whole time. For instance, here's a scene from my recent "Advanced Python Mastery" course:
Finally, I should emphasize that you do not need to be an expert in the course topics to attend--in fact, that's the whole point. All you need is a passion for Python and a desire to learn new things. If you come, you'll have a great time.
More information on the upcoming course can be found here. Hopefully I'll see you in a future class.
Friday, August 13, 2010
Five Dubious Reasons to Take My Advanced Python Course at the Last Minute
For the past 10 weeks, my upcoming Advanced Python Mastery course has been sold out. However, a last-minute cancellation has opened up one slot. Here are five, somewhat dubious, reasons why you should attend my August 17-19 course at the last minute:
- You want to get fired (JetBlue version). Scream "I'm not going to take it anymore!", grab your Python books, and make a mad dash to Chicago while leaving your coworkers to meet your project deadline. Yes, I'm looking at you Java.
- You want to get fired (alternate version). If you apply everything that you will learn in this class to someone else's code, they will almost certainly want to fire you.
- You want to keep your job. If you apply everything that you will learn in this class to your own code, you will earn a "job security" merit badge.
- You want to gain 10 pounds. Did I mention that the venue for this course is completely surrounded by a wall of bakeries and coffee shops?
- You want to create a new web framework. Well, maybe you won't do that, but if you take this course you will explore almost every diabolical Python feature framework builders use to perform magic (decorators, metaclasses, descriptors, context managers, generators, coroutines, and more). It will completely change the way you look at Python code. Plus, it's just cool.
If this sounds interesting, registration information is available at http://www.eventbrite.com/event/619728625. Hopefully I'll see you in Chicago next week!
8/16 (Last Chance!) Space is still available and as if you don't need another dubious reason to go, you'll get a chance to do peeks and pokes on the vintage OSI home computer my brother and I resurrected over the weekend.
--DaveArchives
08/01/2009 - 09/01/2009 09/01/2009 - 10/01/2009 10/01/2009 - 11/01/2009 11/01/2009 - 12/01/2009 12/01/2009 - 01/01/2010 01/01/2010 - 02/01/2010 02/01/2010 - 03/01/2010 04/01/2010 - 05/01/2010 05/01/2010 - 06/01/2010 07/01/2010 - 08/01/2010 08/01/2010 - 09/01/2010 09/01/2010 - 10/01/2010 12/01/2010 - 01/01/2011 01/01/2011 - 02/01/2011 02/01/2011 - 03/01/2011 03/01/2011 - 04/01/2011 04/01/2011 - 05/01/2011 05/01/2011 - 06/01/2011 08/01/2011 - 09/01/2011 09/01/2011 - 10/01/2011 12/01/2011 - 01/01/2012 01/01/2012 - 02/01/2012 02/01/2012 - 03/01/2012 03/01/2012 - 04/01/2012 07/01/2012 - 08/01/2012 01/01/2013 - 02/01/2013 03/01/2013 - 04/01/2013 06/01/2014 - 07/01/2014 09/01/2014 - 10/01/2014
![]()
Subscribe to Posts [Atom]